Sunday, September 22, 2013

Caramel Butter-Crunch Bundt Cake

Caramel Butter-Crunch Bundt Cake


A friend posted this recipe on Facebook a year or so ago and I was immediately drawn to its name: who doesn't love caramel, not to mention butter, and to top it all off with butter? Well, I was sold. Sure enough, this was my birthday cake last year and it was seriously delicious. I rarely have dark rum in the house and it is still stupidly scrummy, especially if one uses real vanilla. The only other change I made was to add a cream cheese and lemon glaze but that is entirely optional. 


Ingredients:
250g sour cream
125ml plain yoghurt
1 1/2 tsp bicarbonate of soda
75g roasted walnuts or hazelnuts
385g sugar
2 tsp cinnamon powder
450g plain flour
2 tsp baking powder
1 tsp salt
3 eggs
250g unsalted butter, room temperature and cut into chunks
1 tbsp dark rum
2 tsp vanilla extract
icing sugar for dusting

Method:
1. Preheat oven to 180 C. Butter and flour a 10 cup size bundt pan and set aside.
2. Scoop the sour cream and yoghurt into a bowl and thoroughly mix them together. Stir in the bicarbonate of soda, then leave to stand for about 15 minutes; the mixture aerates and puffs up when you do this.
3. Put the nuts, 110g of the sugar and the cinnamon into a food processor and pulse until the nuts are finely chopped. Pour this mixture into a small bowl. Put the flour, baking powder and salt in the processor and whiz them to combine. Tip them into another bowl.
4. Put the eggs and the remaining 275g of sugar into the processor and whiz them for one minute. add the butter and process everything for another minute.
5. Stir the rum and vanilla extract into the sour cream mixture; this will cause it to deflate somewhat. Add this to the mixture in the processor and blend it all together with a few quick bursts. Add and fold the flour mixture in a few spoonful at a time until it is just combined.
6. Spoon a 2 cm layer of cake batter into the bottom of the prepared bundt tin and smooth out the surface. Sprinkle about 1/3 of the nut mixture over the top and shake the tin gently to even it out. Cover this with another thin layer of batter. Sprinkle the rest of the nut mixture over this. even it out again, then spread the remaining cake batter on top.
7. Bake for 50 to 60 minutes or until a fine skewer inserted in the middle comes out clean. Cool the cake in the tin on a wire rack for 5 minutes. Gently loosen around the sides and central hole. Invert the cake onto the rack and leave it to cool completely.
8. Just before serving, transfer the cake to a cake stand or plate and dust it with icing sugar. You can freeze the cake for up to 3 weeks. 

Monday, June 27, 2011

Hazelnut and Apricot Meringue Cake

I bought the fabulous "Really Helpful Cookbook" by Ruth Watson some eight or so years ago. For some reason, when I did so,  I thumbed through it, drooled over several of the recipes, and then shelved it without ever cooking a single recipe until earlier this year. The truly odd thing was that one of the recipes became the equivalent of a cooking ear-worm: I simply could not stop thinking about this cake but I could not for the life of me think of where I had seen the recipe. This was something of a problem given that I own over two hundred cookbooks. When I finally decided to cook the incredibly delicious "Boursin Stuffed Chicken" that also features in this book, the pages fell open to this recipe and, after all these years, I was able to finally give it a try. 
Let me state up-front that though the cake would tempt even the most entrenched cake-hater, this is a very adult dessert: the apricots have that particular sharpness which is only enhanced by drenching them in hazelnut liqueur and the whole thing is terribly rich. If you like your sweets with a hint of bitterness then this is the dessert for you! All in all it is a spectacular dessert, stacked three layers high it would be the perfect end to a celebratory dinner (with little glasses of Amaretto to wash it down).

To serve 8 (or more if you are stingy with your servings)

FOR THE FILLING
250g unsulphured dried apricots (without stones)
3-4 tbsp amaretto liqueur
3OOml whipping or double cream
1 heaped tbsp natural icing sugar 

FOR THE MERINGUE LAYERS

280g natural caster sugar
1 rounded tsp cornflour
A pinch of ground cloves
5 large free-range egg whites
I00g hazelnuts, toasted and chopped fairly coarsely

YOU WILL ALSO NEED:
The loose bases of 3 cake tins measuring 23cm diameter,
lined, with the edges very lightly oiled with groundnut (or
hazelnut) oil, or 3 baking sheets lined with parchment.


Preheat the oven to 120°C (fan), 140°C (conventional), gas mark 1.

Soak the apricots for about 8 hours in 2 tablespoons of amaretto, plus just enough warm water to cover them. Drain the plumped-up apricots thoroughly, then whizz them in a food processor with 1 tablespoon of amaretto until smooth. If the puree will take a little more amaretto, without becoming too sloppy, add another tablespoon. Leave the puree to one side.


To make the meringue, sift the sugar, cornflour and ground cloves together. Whisk the egg whites in a clean, grease-free bowl until they form stiff glossy peaks, then whisk in a large tablespoon of the sugar mixture. Using a large metal spoon, carefully fold in the rest - about - a fifth at a time. Try to retain as much air in the mixture as possible.

If you want to be 'proper' about it you can line some baking sheets with parchment, and then draw neat circles on which to spread the meringue with architectural precision. I agree with Ms Watson that it is far easier to line appropriate-sized cake tin bases, because the shape's already there, and they take up much less space in the oven. You could also just splodge the meringue down any which way and have a hulking meringue monster of a cake...

Spread the meringue evenly on to the cake tin bottoms, leaving a 1/2 cm gap round the edge for the meringue to expand. Now sprinkle the nuts over each layer - don't worry if some spill over the edges.

Slide the meringue layers into the oven and cook them for 60 minutes. Switch off the oven and leave them for another hour, without opening the door. Remove the meringues from the oven, and leave to cool completely.
Meanwhile, whip the cream with the icing sugar into soft peaks.


To assemble the cake, gently peel off the parchment from the meringues, then place the first layer on to a serving plate, nut-side down. Spread with half the apricot puree, then half the whipped cream. Place the next layer on top, nut-side down, and spread with the remaining apricot and cream. Place the final layer on top, this time nut-side up. Press down very, very gently to meld the layers. Leave in a cool place until required or as long as you can manage not to eat it. This cake doesn't keep particularly well and gets stickier by the day so I recommend eating it all in the one sitting.


Friday, November 26, 2010

Tarte Tatin for Two

It is distressing how easy it is to make a tarte tatin, particularly now that good-quality puff-pastry is readily available. I say 'distressing' because I may or may not have eaten three of these this week, all by myself (please note that the recipe below is meant to serve '2'). I think we can all agree that no matter how delicious, there is only so much sugar and butter one needs to consume in a calendar week...


3 Golden Delicious apples (I've also used Jonathons and Grannies)
1 tbs lemon juice
½ cup (110g) caster sugar
20g unsalted butter, chopped
Ready-rolled puff pastry sheet (must be real butter puff, not oil - if you can get Careme pastry, it's worth the money)
Cream, to serve


1. Preheat oven to 220ºC (200ºC fan-forced).

2. Peel apples, cut into quarters, remove cores (cutting each quarter at the core so it has a “flat” side), and toss the quarters in a large bowl with the lemon juice and 1 tablespoon of the sugar.

3. Using a 20cm frying pan as a guide, cut pastry into a round slightly larger than the pan, prick with a fork.

4. Melt butter in a 20cm non-stick frying pan over medium-high heat. Cover with the remaining sugar. Cook over medium-low heat, shaking pan occasionally to spread around any dark spots that appear, until a rich caramel forms.

5. Place apple quarters into pan, rounded side down, arranging them around pan. Cut remaining apple to fill gaps. Cook the apples over medium heat for about 10 minutes until caramel is bubbling up in the pan, shaking pan occasionally to prevent burnt spots.

6. Lay the pastry over the apples, tucking any protruding edges around edges of pan.

7. Place the pan in the oven, cook for about 25 minutes, or until the puff pastry has risen and cooked. The pastry should be dry and flaky. Stand tarte in pan for 10 minutes before carefully turning out onto a serving plate (do NOT skip this step). Serve with cream.

Tuesday, October 26, 2010

Cherry Marscapone Tart

Yesterday I was shopping for a dinner party we had planned and I was panicking because I could not for the life of me think of what to serve for dessert. Then, without fanfare, in the fruit cabinet, appeared the most gorgeous punnet of fresh cherries. Though remarkably early in the year for such delicacies, they looked dark, plump and delicious and I couldn't resist buying them. Which meant, of course, I had to find something to do with them and this was the winning recipe if for no other reason than the pastry is to die for. I adapted it from a recipe I found in Food With Friends (a great book for entertaining) which called for tokay in the filling...

PASTRY
200g plain flour
100g ground almonds
pinch of salt
150g soft butter, diced
2 egg yolks
1/4 cup caster sugar

Pre-heat the oven to 180 C.
Rub the flour, almonds, salt and butter together to form a breadcrumby mixture.
Lightly beat the yolks and stir in the sugar. Whip it around until the sugar is dissolved - they will go quite stiff initially but when the yolks are fluid again you're good to go.
Make a well in the centre of the flour mixture and pour in the yolks.
Knead the mix gently until you can pull it all into a ball. Wrap in glad wrap and bung it in the fridge for 30 minutes.
Roll the pastry to about 3mm thick and lay it in a greased 25cm fluted tart tin. When I did this the whole thing fell apart into a hundred little clumps so I just pressed it into the tin with my fingers being careful to make sure the pastry is evenly distributed.
Run a knife across the top of the tin to trim the excess and put it back in the fridge for another 30 minutes.
Bake blind for 15 minutes then for another 5 to crisp up the pastry. Allow to cool.

FILLING
250g marscapone
2 medium free-range eggs
1 tsp vanilla extract
3 tbsp amaretto
1/4 cup caster sugar
500g cherries, pitted (I sliced off the cheeks)
icing sugar to serve

Lightly beat together marscapone, eggs, vanilla, amaretto and sugar until combined.
Lay the cherry cheeks cut side down on the cooked pastry and pour over the marscapone mix.
Bake for 20 minutes or until set and golden brown.

The original recipe recommended serving the tart at room temperature to bring out the flavour of the cherries but I served it warm and it was delicious.
Dust with icing sugar and serve with double cream.

Photos to follow!
(I forgot to take some so I will have to cook it again!)

Thursday, July 8, 2010

Ultimate White Chocolate Cheesecake

Years ago I made a white chocolate cheesecake for some friends who loved it so much that it has become something of an urban-legend among our urban-family. Sadly I seem to have somehow lost the original recipe and I have been experimenting with various others for the past few months in the hope of rebottling the lightning. None of the recipes sampled were quite right until I found this fabulous number and adapted it to make it 'white chocolate' flavoured. It's seriously creamy and seriously moreish - the extra effort of baking in a water bath really makes all the difference.

INGREDIENTS
  • 100g butter, melted
  • 300g wheatmeal biscuits
  • 500g cream cheese, at room temperature
  • 200g white chocolate
  • 200g caster sugar
  • 1 tbsp cornflour
  • 3 eggs
  • 1 tbsp lemon juice
  • few drops pure vanilla, or vanilla extract to taste
  • pinch of salt
  • 2 cups sour cream
Preheat oven to 180ºC.

Brush the base and sides of a 22cm x 6cm deep springform tin with a little of the melted butter. Remove the base from the tin.
Cut a round of baking paper to fit the base of the tin, brush the paper with a little butter and set aside.
Tear off an 80cm sheet of foil and double it over so it measures 40cm in length. Lay the foil over the base of the tin, then put the buttered round of paper on top. Sit the springform tin over the base and lock the sides into place, leaving excess foil outside the tin. Draw up the excess foil around the tin and fold the top out of the way. You now have a watertight container.

Crush the biscuits in a food processor. Add the remaining butter and process. Press the crumb mixture into the base of the tin (and up the sides if you wish), tapping firmly with the base of a glass tumbler or similar as you go.
Beat the cream cheese and sugar in an electric mixer until smooth. Add the white chocolate and then beat in the cornflour, then add the eggs, 1 at a time, beating each time just until smooth. Add the lemon juice, vanilla and salt. Add the sour cream and beat briefly to combine. Be careful not to over-beat or the cake will deflate in the oven.

Pour the batter into the tin and stand the tin in a large baking dish. Pour boiling water into the dish to come halfway up the sides of the tin. Bake for 50 minutes, then turn off the oven but do not open the door for a further hour.
Lift the tin from the water bath and flatten the foil away from the sides just in case there is any water trapped inside. Cool completely in the tin on a wire rack and refrigerate for several hours or overnight before serving.
This would be particularly delicious with a raspberry coulis...

Sunday, June 6, 2010

Banoffee Pie


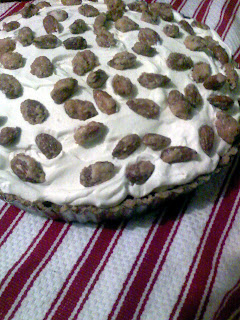
The Banoffee Pie was invented by The Hungry Monk restaurant of Sussex, U.K., in 1972. Traditionally the recipe includes a hint of coffee in the cream and a shortcrust pastry base. The hybrid of three or four recipes seen below was due to my not having all the ingredients on hand to make the bona fide version.

200g blanched whole almonds
300g icing sugar
2 x 400g tins condensed milk, boiled for 3hrs in their tins
6 bananas
600 ml double cream
Seeds from 1 vanilla pod
150g butter, melted
250g digestive biscuits, crushed
Cocoa for dusting

Pre-heat the oven to 180C

Equipment:

20cm loose-bottomed cake tin, greased and based lined.

To make the base:

Crush the biscuits in a food processor (or the old-fashioned way by putting in a plastic bag and whacking) until like fine crumbs then put into a bowl. Stir in the melted butter. Press the mixture into the base and up the sides of the tin. Chill the base while you make the filling.


Filling:

Give the almonds a rinse in water, drain them a little and mix them quickly with the icing sugar in a bowl until they are really sticky. Tip them on to a baking tray and toast for 15 minutes in the oven until they are golden and crispy, turning them every couple of minutes. Remove them from the oven and allow to cool.


Spread the toffee as thick as you like across the base of the pastry. Slice the bananas and place on top of the toffee, then whip the cream with the vanilla. Then dollop the cream on top of the bananas, as high and as rough as you like.


Sprinkle the almonds over the top of the banoffee pie, dust with cocoa (I didn't have any) and serve immediately.

Wednesday, October 7, 2009

Mrs Fields: eat your heart out!

I've found it, the holy grail of cookies.

I baked these with my daughter over the weekend and they were exactly what I wanted: chewy, chocolatey and horrifically more'ish. I made them with Nestle choc bits and I think next time I would use a less sugary chocolate, something richer and more oomphy. Other than that, they were perfect (and oh so simple!). These would be amazing made with white chocolate and macadamia...

Ingredients

  • 2 cups plain flour
  • 1/2 teaspoon baking soda
  • 1/2 teaspoon salt
  • 170g unsalted butter, melted
  • 1 cup packed brown sugar
  • 1/2 cup white sugar
  • 1 tablespoon vanilla extract
  • 1 egg
  • 1 egg yolk
  • 2 cups chocolate chips

Method

  1. Preheat oven to 165 degrees C. Grease baking trays or line with baking paper.
  2. Sift together the flour, baking soda and salt and set aside.
  3. In a medium bowl, mix the melted butter, brown sugar and white sugar until well blended. Beat in the vanilla, egg and egg yolk until light and creamy, then add the sifted ingredients until just blended. Stir in the chocolate chips by hand using a wooden spoon. Drop cookie dough 1/4 cup at a time on to the baking trays. Be sure to space the "mounds" apart as they spread significantly during cooking.
  4. Bake for 15 to 17 minutes, or until the edges are lightly browned. Remove from oven and allow to cool on trays for a few minutes before transferring to wire racks to cool completely.